
- 温湿度センサ(DHT11)を動かしてCSVに記録する [1]
- 温湿度センサーから得たデータをCSVに記録してグラフ化する [2]
- DiscordBotにコマンドを送ってグラフを作成させる [3]
- ラズパイ同士のファイル共有によって最新データを取得する [4]
前回はDHT11から得たデータをグラフ化してDiscordWebhookで送信することができました。
ですが、前回のプログラムは手動で実行する必要があり、Webhookで送る意味があまりないことに気付きました。
また、CSVのデータが増えることでグラフも見づらくなってしまいます。
そこで、今回は日付毎にCSVファイルを作成してデータを記録するように変更します。
その後、DiscordBotを利用してより実用的なプログラムを作成していきます。
今回使用するもの
Bot用にRaspberryPi zeroを使用します。
動作確認だけしたい人はPCでも作成可能です。
DiscordBotの作成については省略しています。
- RaspberryPi 4(DHT11接続用)
- RaspberryPi zero(Bot用)
- ブレッドボード
- ジャンプワイヤ
- DHT11
- Discord Bot TOKEN
- Discord Bot Server ID
- GoogleDrive API
- 前回使用したプログラム
Google Drive APIの利用登録や初回実行時の操作などに関しては省略しています。
実現したい動き
RaspberryPi(1)温湿度記録用
    取得した温湿度データを日毎に分けてCSVに記録
    日付が変わったら前の日のCSVをGoogleDriveにアップロード

RaspberryPi(2)DiscordBot用
    ユーザーからのコマンドを認識
    ユーザーが欲しいデータを入力
    GoogleDriveから該当のCSVデータを読み込む
    グラフを作成する
    画像を送信
日毎にCSVにデータを記録する
次のように変更していきます。
現在の日付を取得(yyyy-mm-dd)
温湿度取得---①

yyyy-mm-dd.csvがあるか確認
    ある→yyyy-mm-dd.csvに①を記録
    ない→yyyy-mm-dd.csvを作成して①を記録
CSVの保存先は「data」フォルダとなっています。
同じディレクトリに作成してください。
変更後
import RPi.GPIO as GPIO
import dht11
import time
import datetime
import csv
from time import sleep
import requests, json

import os

GPIO.setwarnings(False)
GPIO.setmode(GPIO.BCM)
instance = dht11.DHT11(pin=14)

def attention_temp(dt, temp):
    webhook_url = 'webhook URL'
    main_content = {'content': '[Room temperature too high]\n' + str(dt) + '\n' + 'TEMP : ' + str(temp) + ' C',
                    'username': 'Attention'}
    headers = {'Content-Type': 'application/json'}
    response = requests.post(webhook_url, json.dumps(main_content), headers=headers)

try:
    while True:
        dt = datetime.datetime.now().replace(microsecond=0)
        unix = int(time.time())
        unix_15 = unix + 900
        print('Start: ' + str(dt))


        while True:
            dt_csv = datetime.date.today()

            path = 'data/' + str(dt_csv) + '.csv'
            #print(path)

            #Check to see if the file exists
            is_file = os.path.isfile(path)
            if is_file:
                #print('ok')
                pass
            else:
                print('none')
                with open(path, 'w') as f:
                    fieldnames  = ['DateTime', 'Temperature', 'Humidity']
                    writer = csv.DictWriter(f, fieldnames=fieldnames )
                    writer.writeheader()
                    print('created')

            result = instance.read()
            if result.is_valid():
                u_time = int(time.time())
                s_time = unix_15 - u_time

                print("Last valid input: " + str(dt))
                print("Temperature: %-3.1f C" % result.temperature)
                print("Humidity: %-3.1f %%" % result.humidity)

                temp = result.temperature
                humi = result.humidity
                data = [[dt, temp, humi]]

                #Set Temperature
                if temp > 35:
                    print('too high')
                    attention_temp(dt, temp)
                else:
                    pass

                with open(path, 'a') as f:
                    writer = csv.writer(f)
                    writer.writerows(data)

                print('\nsleep')
                sleep(s_time)
                break

            else:
                e_time = datetime.datetime.now().replace(microsecond=0)
                print("Error: " + str(e_time))
                sleep(1)

except KeyboardInterrupt:
    print("Cleanup")
    GPIO.cleanup()
これで、日毎にCSVファイルが作成されて一日分のデータを記録することができるようになりました。
「example.py」は一旦置いておきます。
GoogleDriveにアップロードする
今回作成したいプログラムではGoogleDriveにCSVファイルをアップロードしたりダウンロードしたりする処理が含まれています。
まずは、GoogleDriveを用いたファイル操作の部分からコードを書いていきます。
DriveにCSV保存用のフォルダ「DHT11_DATA」を作成してください。
from pydrive2.auth import GoogleAuth
from pydrive2.drive import GoogleDrive

gauth = GoogleAuth()
gauth.LocalWebserverAuth()
drive = GoogleDrive(gauth)

folder_id = 'DHT11_DATAのフォルダID'
file_path = 'zzz.csv' #csvの名前

file = drive.CreateFile({'title': file_path, 'parents': [{'id': folder_id}]})
file.SetContentFile(file_path)

file.Upload()
print('Uploaded')
GoogleDriveにCSVファイルがアップロード出来ていると思います。
GoogleDriveからダウンロードする
指定した日付のCSVデータをダウンロードするプログラムです。
先に適当な日付のCSVファイルを作成しておき、上記のプログラム(gdrive_upload.py)でGoogleDriveにアップロードしてから実行してみてください。
手動でアップロードしたファイルはなぜか取得できませんでした。
必ずgdrive_upload.pyでアップロードしてから確認してください。
24行目以降の処理は指定したファイルが見つかったのかどうかを判定する部分です。
後でBotを使用するときにファイルが見つからなかった時の処理を記述したいため書いています。
from pydrive2.auth import GoogleAuth
from pydrive2.drive import GoogleDrive

f_serch = input('type:') #テスト用

gauth = GoogleAuth()
drive = GoogleDrive(gauth)
drive_folder_id = 'DHT11_DATAのフォルダID'
save_folder = 'ダウンロードしたCSVの保存先(パス)'

query = {'q': '"{}" in parents and trashed=false'.format(drive_folder_id)}

judge = 0
for f in drive.ListFile(query).GetList():
    #print(f['title'],f['id'])
    if f['title'] == f_serch + '.csv':
        f_csv = drive.CreateFile({'id':f['id']})
        f_csv.GetContentFile(save_folder + f['title'])
        judge += 1
    else:
        pass

#print(judge)
if judge == 0:
    print('[Not Found]', f_serch + '.csv')
else:
    print('[Downloaded]', f_serch + '.csv')
完成版【温湿度測定コード】
温湿度記録用のラズパイでは記録が終わったデータをGoogleDriveにアップロードします。
先ほどの「gdrive_upload.py」のコードを「example.py」に組み込んでいきます。
import RPi.GPIO as GPIO
import dht11
import time
import datetime
import csv
from time import sleep
import requests, json
from pydrive2.auth import GoogleAuth
from pydrive2.drive import GoogleDrive
import os

GPIO.setwarnings(False)
GPIO.setmode(GPIO.BCM)
instance = dht11.DHT11(pin=14)

def attention_temp(dt, temp):
    webhook_url = 'webhook URL'
    main_content = {'content': '[Room temperature too high]\n' + str(dt) + '\n' + 'TEMP : ' + str(temp) + ' C',
                    'username': 'Attention'}
    headers = {'Content-Type': 'application/json'}
    response = requests.post(webhook_url, json.dumps(main_content), headers=headers)

def csv_upload(dt_csv_yesterday):
    gauth = GoogleAuth()
    gauth.LocalWebserverAuth()
    drive = GoogleDrive(gauth)

    folder_id = 'アップロード先「DHT_DATA」フォルダのID'
    file_path = 'data/' + str(dt_csv_yesterday) + '.csv'
    file_name = str(dt_csv_yesterday) + '.csv'

    file = drive.CreateFile({'title': file_name, 'parents': [{'id': folder_id}]})
    file.SetContentFile(file_path)

    file.Upload()
    print('Uploaded', file_name)

try:
    while True:
        dt = datetime.datetime.now().replace(microsecond=0)
        unix = int(time.time())
        unix_15 = unix + 900
        print('Start: ' + str(dt))

        while True:
            dt_csv = datetime.date.today()
            path = 'data/' + str(dt_csv) + '.csv'

            is_file = os.path.isfile(path)
            if is_file:
                pass
            else:
                with open(path, 'w') as f:
                    fieldnames  = ['DateTime', 'Temperature', 'Humidity']
                    writer = csv.DictWriter(f, fieldnames=fieldnames )
                    writer.writeheader()
                    print('Created', path)

                    #前日のCSVファイルの名前
                    dt_csv_yesterday = dt_csv + datetime.timedelta(days=-1)
                    csv_upload(dt_csv_yesterday)

            result = instance.read()
            if result.is_valid():
                u_time = int(time.time())
                s_time = unix_15 - u_time

                print("Last valid input: " + str(dt))
                print("Temperature: %-3.1f C" % result.temperature)
                print("Humidity: %-3.1f %%" % result.humidity)

                temp = result.temperature
                humi = result.humidity
                data = [[dt, temp, humi]]

                if temp > 35:
                    print('too high')
                    attention_temp(dt, temp)
                else:
                    pass

                with open(path, 'a') as f:
                    writer = csv.writer(f)
                    writer.writerows(data)

                print('\nsleep')
                sleep(s_time)
                break

            else:
                e_time = datetime.datetime.now().replace(microsecond=0)
                print("Error: " + str(e_time))
                sleep(1)

except KeyboardInterrupt:
    print("Cleanup")
    GPIO.cleanup()
DiscordBotのPythonコード
Botの詳しい作り方は省略しています。
今回のBotは次のように動作します。
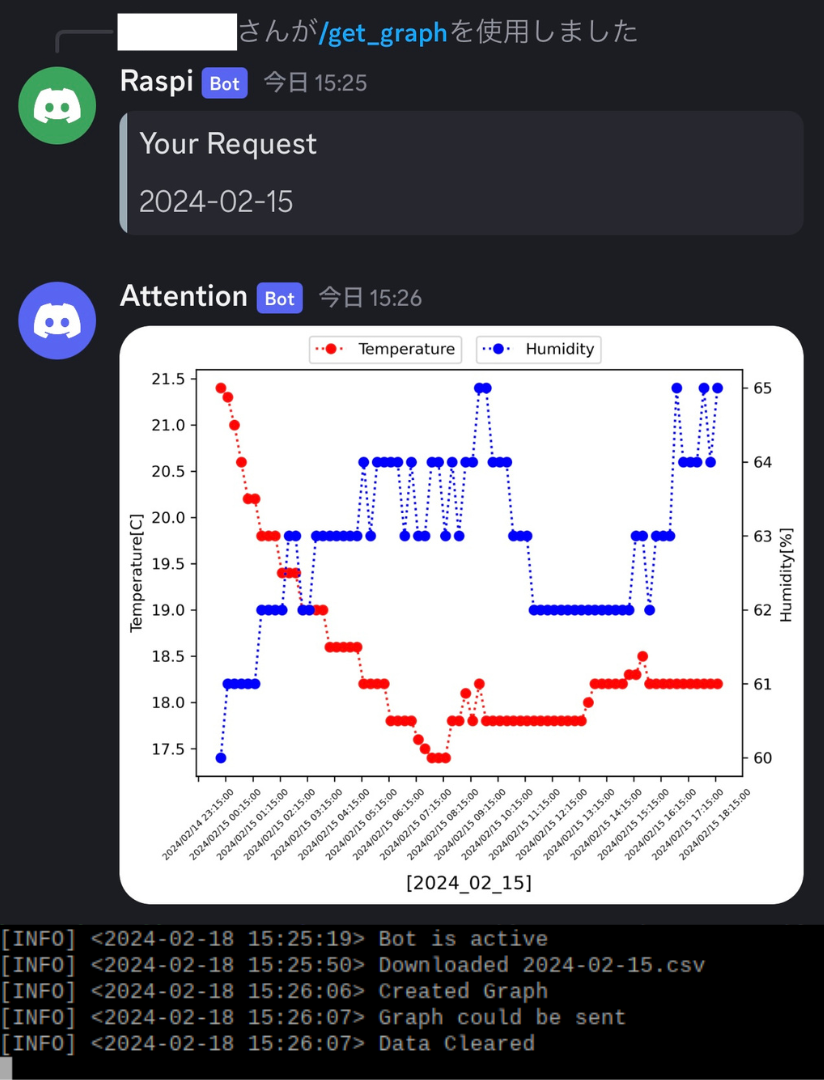
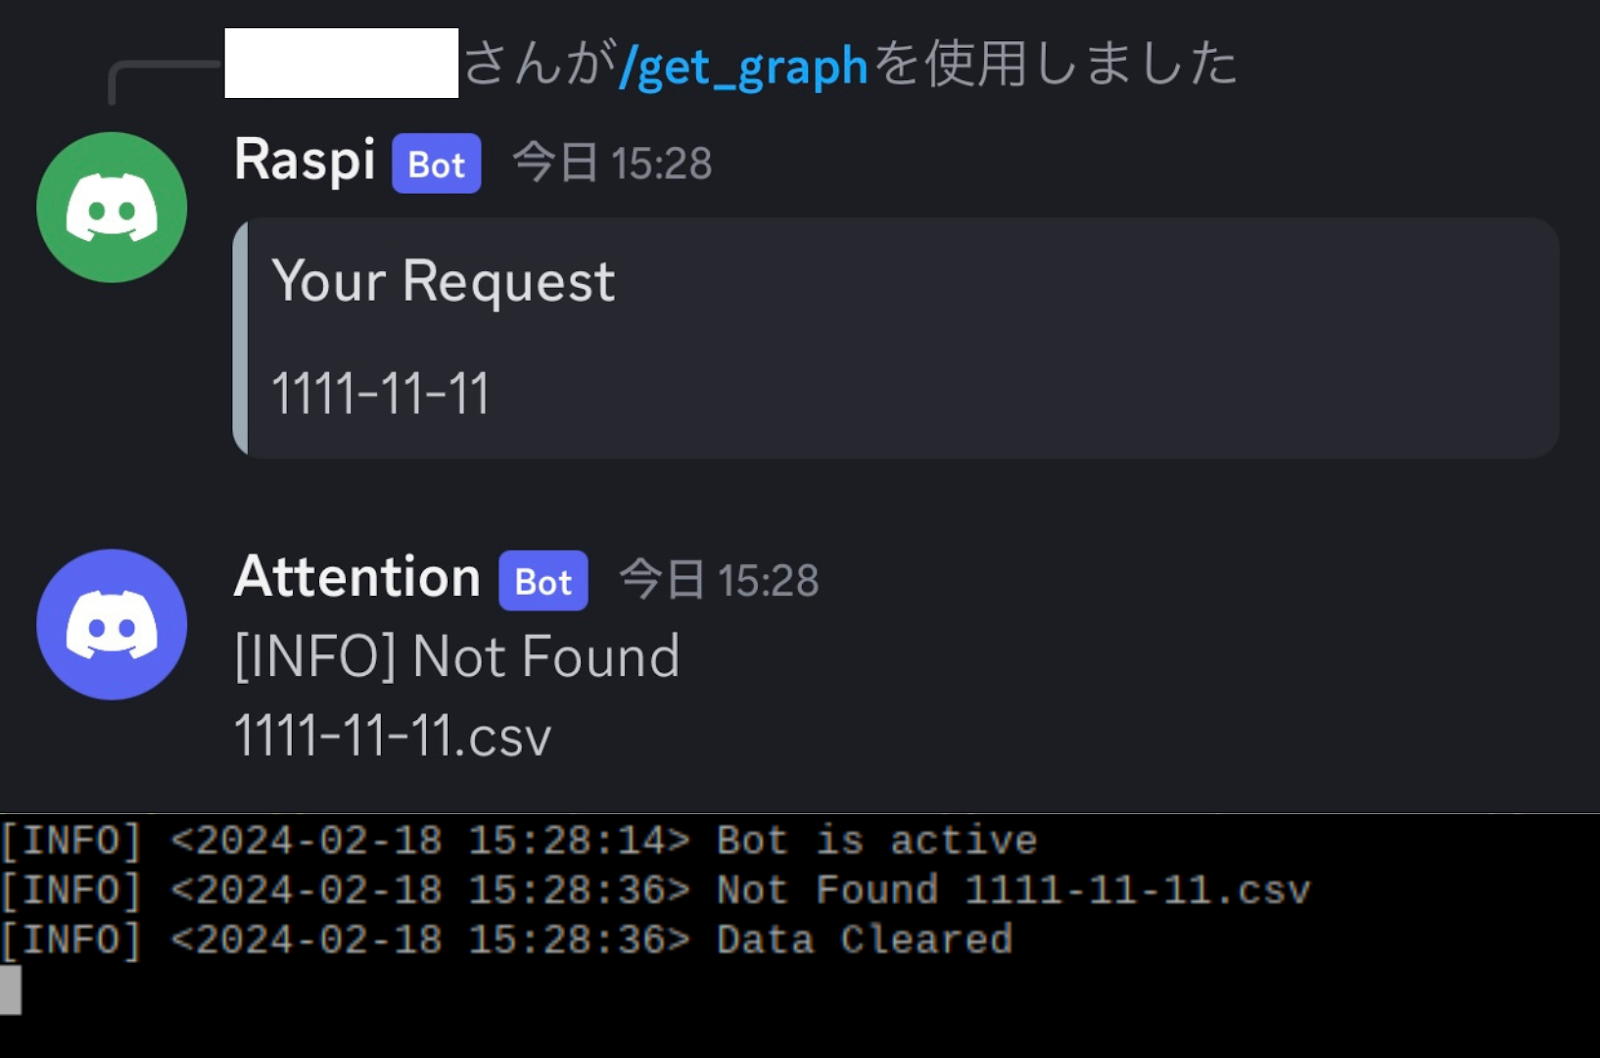
Botの起動
ユーザーがコマンドを送信
入力された日付と一致するCSVファイルをGoogleDriveからダウンロードする
ダウンロードしたCSVファイルを分析してグラフ化
DiscordWebhookで送信する
ディレクトリ構成は次のようになっています。
/home/pi/Desktop/DiscordBot/
    |_____DataForAnalysis-----CSVとグラフ画像の保存先
    |_____client_secret.json
    |_____credetials.json
    |_____setting.yaml
    |_____raspi_discord.py
これまでに作成してきた「CSVをグラフ化するプログラム」「gdrive_download.py」などを「raspi_discord.py」に組み込みます。
import discord
from discord.ext import commands
import asyncio
from pydrive2.auth import GoogleAuth
from pydrive2.drive import GoogleDrive
import pandas as pd
import matplotlib.pyplot as plt
import matplotlib.dates as mdates
import datetime
import json
import requests
import os

def csv_graph(f_serch):
    path = 'DataForAnalysis/' + f_serch + '.csv'
    df = pd.read_csv(path)
    fig = plt.figure()
    ax1 = fig.subplots()
    ax2 = ax1.twinx()
    x_time = pd.to_datetime(df['DateTime'])
    y_temp = df['Temperature']
    y_humi = df['Humidity']
    img_name = x_time[0].strftime('%Y_%m_%d')
    c_temp, c_humi = 'red', 'bule'
    l_temp, l_humi = 'Temperature[C]', 'Humidity[%]'
    ax1.set_ylabel(l_temp)
    ax1.plot(x_time, y_temp, color='red', label='Temperature', marker='o', linestyle='dotted')
    ax1.legend(loc='upper right', bbox_to_anchor=(.5, 1.1))
    ax2.set_ylabel(l_humi)
    ax2.plot(x_time, y_humi, color='blue', label='Humidity', marker='o', linestyle='dotted')
    ax2.legend(loc='upper left', bbox_to_anchor=(.5, 1.1))
    labels = ax1.get_xticklabels()
    locator = mdates.MinuteLocator(15)
    #locator = mdates.AutoDateLocator()
    ax1.xaxis.set_major_locator(locator)
    ax2.xaxis.set_major_locator(locator)
    plt.gca().xaxis.set_major_formatter(mdates.DateFormatter('%Y/%m/%d %H:%M:%S'))
    plt.title('[' + img_name + ']',  y=-0.3)
    plt.setp(labels, rotation=45, fontsize=6)
    plt.savefig('DataForAnalysis/TempHumi_[' + str(img_name) + '].png', bbox_inches='tight', dpi=300)

    print('[INFO] <' + str(datetime.datetime.now().replace(microsecond=0)) + '> Created Graph')

    WEBHOOK_URL = "webhook URL"
    with open('DataForAnalysis/TempHumi_[' + img_name + '].png', 'rb') as f:
        file_bin = f.read()
    dht_img = {
        "favicon" : ("TempHumi[" + str(img_name) + "].png", file_bin),
    }
    res = requests.post(WEBHOOK_URL, files=dht_img)
    if res.status_code == 200:
        print('[INFO] <' + str(datetime.datetime.now().replace(microsecond=0)) + '> Graph could be sent')
    else:
        print('[INFO] <' + str(datetime.datetime.now().replace(microsecond=0)) + '> Graph could not be sent')

intents = discord.Intents.default()
intents.message_content = True

bot = commands.Bot(
    command_prefix=commands.when_mentioned_or("!"), debug_guilds=[サーバーID], intents=intents
)

@bot.event
async def on_ready():
    print('[INFO] <' + str(datetime.datetime.now().replace(microsecond=0)) + '> Bot is active')

class MyModal(discord.ui.Modal):
    def __init__(self, *args, **kwargs) -> None:
        super().__init__(
            discord.ui.InputText(
                label="FileName",
                placeholder="yyyy-mm-dd",
            ),
            *args,
            **kwargs,
        )

    async def callback(self, interaction: discord.Interaction):
        embed = discord.Embed(
            title="Your Request",
            fields=[
                discord.EmbedField(
                    name="", value=self.children[0].value, inline=False
                ),
            ],
            color=discord.Color.from_rgb(153,170,181)
        )
        await interaction.response.defer()

        #ここから
        f_serch = self.children[0].value
        gauth = GoogleAuth()
        drive = GoogleDrive(gauth)
        drive_folder_id = 'Google DriveのフォルダID'
        save_folder = 'DataForAnalysis/'
        query = {'q': '"{}" in parents and trashed=false'.format(drive_folder_id)}
        judge = 0
        for f in drive.ListFile(query).GetList():
            if f['title'] == f_serch + '.csv':
                f_csv = drive.CreateFile({'id':f['id']})
                f_csv.GetContentFile(save_folder + f['title'])
                judge += 1
            else:
                pass
        if judge == 0:
            print('[INFO] <' + str(datetime.datetime.now().replace(microsecond=0)) + '>', 'Not Found', f_serch + '.csv')
            webhook_url = "webhook URL"
            main_content = {'content': '[INFO] Not Found\n' + f_serch + '.csv',
                            'username': 'Attention'}
            headers = {'Content-Type': 'application/json'}
            response = requests.post(webhook_url, json.dumps(main_content), headers=headers)

        else:
            print('[INFO] <' + str(datetime.datetime.now().replace(microsecond=0)) + '>', 'Downloaded', f_serch + '.csv')
            csv_graph(f_serch)

        #ダウントードしたCSVとグラフ画像を毎回消したいとき
        dir_data = 'DataForAnalysis/'
        for f in os.listdir(dir_data):
            os.remove(os.path.join(dir_data, f))
        print('[INFO] <' + str(datetime.datetime.now().replace(microsecond=0)) + '> Data Cleared')

        await interaction.followup.send(embeds=[embed])

@bot.slash_command(name="get_graph")
async def modal_slash(ctx: discord.ApplicationContext):
    """指定された日のデータをグラフ化します"""
    modal = MyModal(title="Graphing Data")
    await ctx.send_modal(modal)

@bot.message_command(name="messagemodal")
async def modal_message(ctx: discord.ApplicationContext, message: discord.Message):
    """"""
    modal = MyModal(title="Message Command Modal")
    modal.title = f"Modal for Message ID: {message.id}"
    await ctx.send_modal(modal)

@bot.command()
async def modaltest(ctx: commands.Context):
    """Shows an example of modals being invoked from an interaction component (e.g. a button or select menu)"""
    class MyView(discord.ui.View):
        @discord.ui.button(label="Modal Test", style=discord.ButtonStyle.primary)
        async def button_callback(
            self, button: discord.ui.Button, interaction: discord.Interaction
        ):
            modal = MyModal(title="Modal Triggered from Button")
            await interaction.response.send_modal(modal)
        @discord.ui.select(
            placeholder="Pick Your Modal",
            min_values=1,
            max_values=1,
            options=[
                discord.SelectOption(
                    label="First Modal", description="Shows the first modal"
                ),
                discord.SelectOption(
                    label="Second Modal", description="Shows the second modal"
                ),
            ],
        )
        async def select_callback(
            self, select: discord.ui.Select, interaction: discord.Interaction
        ):
            modal = MyModal(title="Temporary Title")
            modal.title = select.values[0]
            await interaction.response.send_modal(modal)

    view = MyView()
    await ctx.send("Click Button, Receive Modal", view=view)

bot.run("DiscordBot TOKEN")
実行結果
実行したデバイス [RaspberryPi zero]

Botの起動
     25秒
データをリクエストしてからグラフが送信されるまで
     21秒
存在するデータを指定した時
存在しないデータを指定した時
まとめ
今回はRaspberryPi zero でBotを作成したため、処理を行うときにCPU使用率がかなり上がっていました。
そのため、Botの起動やグラフの作成に20秒以上かかっています。
機能を増やしたり、重い機能を付け加えたりするとPi zeroでは性能不足に陥ってしまう可能性があります。
用途によってはRaspberryPi zero2やRaspberryPi 3以降の機種を使うと良さそうです。
今後実装する予定の機能
- 保存された全データの名前を出力
- 取得した最新のデータの出力
- 現在位置の天気情報と照らし合わせる


0 件のコメント:
コメントを投稿